Monday, 5 May 2014

Bank Holiday Busyness!

Genuinely thought it was Sunday! 

Howdy people!! Have you all had a lovely bank holiday weekend?? Mine has been massively busy Friday consisted of working the morning and egg collecting at the plot in the afternoon.  The chickens are now paying for themselves: 


Friday night consisted of the most delicious curry, out with lovely friends and topped off with acting the maggot in my gorgeous nephews toy corner:

(Note that's a Minion in the toy corner and NOT my Nephew - in case you where slightly confused!)


Saturday I spent sometime on the plot planting up some Swiss Chard, which I've had in little pots since last autumn, if I'm honest I actually stumbled across them, I had forgotten I had them.  There's five little plants in total:


I also planted some Purple Sprouting Broccoli.  I think I may have to stake these at some point to stop them toppling over:


The Gooseberries are really coming on on the plot.  They were transplanted down there last year from my garden and so they didn't give off any fruit last year - maybe they were getting themselves established?   But this year they look like I'll get the best harvest off them yet:


I picked yet more Rhubarb (honestly there's only so much Rhubarb one family can handle (!), but with the latest pick I'm planning on making a Rhubarb Tart for a party next weekend and some lovely Rhubarb syrup.  You can find this recipe and lots of other topics of loveliness over at :countryskillsblog.com

On Saturday evening I spent some lovely time in the garden with 'Frankie Home Hen' sat on my knee, just chillin'.  She seems to have really bonded with me, more than the other really (psst don't tell Mr husband, but the home hens aren't going to the allotment!)

Sunday, was all about family time, and we had a lovely day.  We went to local Nature Reserve called Brockholes. It really is fabulous here and I'm so annoyed I forgot to take my camera!! They had scarecrow festival on this weekend, which had a two and a half mile Scarecrow Trail.  It takes you around the reserve and into the woods:


And they have the most fabulous visitors centre and restaurant that floats on water!! You can sit and have your lunch on water!  The visitors centre has lots of educational activities for children to take part in as well as some videos and information of the animals that live within the reserve.   There have various nature trails (some with hides on, for you to watch the wildlife) all different lengths and the paths all seem to be accessible for prams and wheelchairs.  It's fabulously priced, educational and there's something for everyone.  The kids mostly enjoyed the climbing forest areas as well as the gravel quarry and the zip wire (in fact I think Mr Husband enjoyed the zip wire a little bit more!)   Honestly if you ever get the chance to go then do.  You wont be disappointed!

And so to today, well the Peas have been nibbled.  I knew they would, not badly mind but somethings had a good munch on them!  I was talking to Allotment Nigel about how I could possibly win the award for cr*pest allotmenteer 2014.  He however, had a solution that he uses:

Take plastic bottles:


Saw off the ends:


And put over the Peas until they are a little bit more established:


In other news, Boo was more than excited that her sunflowers are growing:


 And here is one of my favourite pictures of the week, taken in my back garden on the apple tree:


Bye for now and Happy Planting. Xx

Sunday, 27 April 2014

An April Plot Round Up & The Garden

I'm going to apologize in advance, it's going to be a long post!

The end of April is pretty much here and it's been a rather productive month (and when I say that, I mean for me, because I'm so lax when it comes to planting stuff.  I see other allotments around me and I'm way behind, but equally - I'm not that bothered either,  I'm happy to go about it in my own time).


The potatoes are now in the bags - planted up by Miss Boo - she got more soil on the floor than in the bags to be fair!

She also decided to plant up Pansies as well as sunflowers in tubs for either side of the shed:


And some pansies on the 'window box' on the chicken run:


I've also got the garlic planted.  My garlic didn't too well last year, I'm not really sure why, and to be honest I wasn't going to bother with them this year but decided there was no harm in trying:


And I must say they aren't doing too badly (so far!).  I took this picture today:


The onions are coming up slowly but surely, despite the fact that Boo was digging today and was so excited she'd found something - yes it was an onion! (Honestly between her and the hens!)


Today I've been to the plot and I planted up the peas that had grown in the windowsill propagator that Mr B planted a few weeks ago:


Even though I've had the plot a good couple of years now, when it comes to planting I still have now idea as to what to do and so I arm myself with the following:


The dibber
The age old ruler
The trowel
& The Essential Allotment Guide by John Harrison


Honestly now, this book is great it tells you everything you need to know and I have found it invaluable.  (No, I don't know John, I've never met him, he's isn't paying me to say this)

So firstly, the peas needed splitting:


It's not difficult to do but you have to be light fingered and gently prize them apart without damaging the roots:  (Thanks Boo for the good camera skills!)

Then they need planting 4 inches apart (great for practicing times tables on the plot - for Boo not me!)


(It's when she takes pictures like this without me knowing that I realise I seriously need to do something about my overactive pie-arm!!)

A good water, make sure then hens cant get them and they should be fine.  Ideally I would have covered them with small cloches just for now, but don't have any - maybe I wont have pea plants come tomorrow thanks to the slugs!  We shall see.

Now to the garden, I'm always so envious of those who have nice gardens,  for all the work I put in on the plot, the garden I just can't be bothered with.  And then , when I do bother the dog normally wrecks it!  For example, last weekend he completely trashed my Clematis running at the fence!!  This year however, I'm going to try and make a conscience effort to have a nice garden.

Today I've planted some sweet peas along the fence, an apple tree and two more Clematis, in a pot just to the left of it (with a bit of luck if the dog runs at it, he'll knock himself out!).  I've also got some wildflower seeds to plant up as well:


I've bought lots of herbs over the last few weeks in order to make Mr Husband a herb garden,  originally I was going to put them in the front, we have a huge Acer tree out there which is just taking over and the herbs wont get enough light, so over the next few weeks I'm going to put them out the back in tubs.

Here is Sargent Tazbo (the bad ass cat who needs an ASBO) looking all pleasant and cute (HE IS NOT!) next to one of the new Lavender plants:


I also have some night scented stocks to plant up and around maybe the back window, I'll have to check the best position to put them. 

And finally,  the hens are still at home, having a great time and I'm not going to lie,  I'm going to really miss them when they have to go to the plot.  They are currently living in with rabbits outside in the big run, but when I'm home and the door is open they roam around the garden with the dogs keeping guard for any unwanted cat visitors.  As you  can see they quite happily come into the house:


And drink out of the water feature:


Bye for now & happy planting Xx


Monday, 21 April 2014

Guest Blog Post - New Garden by Johnathan at Wholesome Day

Hello you lovely lot!  I hope you're having a Fabby Easter weekend? Mine has been hectic consisting of family times, re-building rabbit runs and greenhouse failures (and the most delicious Roast Beef dinner cooked by mum - as a non meat eater, due to my health, I enjoyed every moment of it!) !!  I've been so busy in fact that I've just not had time to do much over at the plot and therefore, not really much of a blog post.  However, I do have a little treat for you, instead of me harping on at y'all as usual I opened up the blog this week for a guest post from Johnathan over at Wholesomeday , you can also find him on twitter at: @wholesomeday . I hope you all enjoy it as much as I have!!


New Garden.

Last year we moved to a new house in a small Cambridgeshire village. We moved house in June so by the time we were unpacked we only had a short time left to grow some vegetables and enjoy our new garden.

This year we have the chance to plan our new garden around what we have inherited and start to put down roots for the future.

I have always loved the idea of growing fruit in the garden and have been inspired watching programs on walled gardens with fruit trees growing as cordons.

(I love this Idea - and I'm going to 'steal' it for my shed - Deb)

My plan once I have painted the fences is to create some support with wires along the length of the fence and plant our grape vine that we have had in a pot for years, a cooking apple tree, an eating apple tree and a plum tree with around 6 foot space each along the sunniest side of our new garden.

We have been very lucky to inherit a sunny area at the front of the house that is perfect for a herb garden.


The previous owners had already graveled the whole area and planted many chives, fennel, lavender and some rosemary bushes along with other small bushes.


We have now started the process of swapping anything non-edible for other herbs we can use in cooking and for making teas.


So far we have removed some larger shrubs and added sage, mint and lemon balm and moved some of the lavender bushes to line the path to create a cottage style garden.


In the back garden I wanted to keep the lawn and seating areas already in place so our pet rabbits and guinea pigs had somewhere to play.


 Around the outside of the lawn is another gravel area around 1.5 meters wide. In this area I have built a small raised bed around 1m by 2m in a corner and bought some large terracotta pots to put around the edge of the garden in summer with vegetables in when the raised bed is overflowing.

I really want to make the small raised bed and pots work for us and provide lots of fresh veg through the year so I have been busy planning the year out on paper with a rough guide to when I can plant out to get the maximum from the space.


I am going to use our window sills and pots to start off smaller seeds that can be transferred into place when space is free and have planted some early crops into the bed.

The first thing I did was plant 4 dwarf broad beans seeds in the raised bed on Valentines day. When we were younger we had an allotment and the retired gentleman with the plot next door swore by this date for sowing broad beans and judging by his results -  who am I to argue!

Since then I have also planted leaks, peas, radishes, lettuce and some carrots in the raised bed backed up by kale, courgettes, more leeks & lettuce on the window sill inside. I am using The radishes around the slower growing seeds to use the space, they have taken better than i thought so we are now looking for ways to get radish in every meal!


My plan with this small space is to eat things young and regularly to keep a good supply of fresh veg going, the courgettes will mainly be in large pots and I will keep sowing in pots in succession so I have always got something growing to make use of the space. I am hoping to keep the year rolling by planting some veg over winter so we have something fresh early next year when it all starts again.

This year is really all about finding out what we can do in the space and trying some ideas, I'm sure some things will do well and others not so well but that is the excitement in growing your own.

I will let you know how we get on!

I'll tell you why I love this? I love the fact that everything is at home on their doorstep, that you can literally walk outside and pick your tea.  The main reasons I have the plot are because I don't have the space at home and I know that if I did the dog would run ragged all through my veggies (they've already had my clematis this weekend!)!  Please if you get the chance follow Johnathan on twitter and visit his website, so you can see how he's getting on.  - Deb

  Bye for now & happy planting! Xx

Sunday, 13 April 2014

Project Hen House - Part 1

Like most chicken keepers I would undoubtedly prefer a plastic hen house as opposed to a wooden one.  They are easier to clean, they don't get red mite, they are lighter to carry, but they cost an absolute fortune! If my hens were at home in my garden I would probably consider the thought of getting one second hand plastic hen house and spending a bit more money, but because they are down at the allotment and I'm not there all the time and because some of the paths running through  the allotment site are public footpaths, I wouldn't want to run the risk of someone trying to nick it and scaring the hens.  So up until now I've had a wooden one.

I got my wooden hen house maybe last April, used protective wood paint etc.. and it started warping before Christmas, not only that despite cleaning it out regularly and thoroughly we got red mite, and if you've got hens then you know once you get them, its really hard to get rid of them.

So I was thinking and googling plastic hen house ideas and came across a proper little treat!!

Now before I continue with the rest,  I only wish that I could take credit for this design, because frankly, you'd all think I was a genius, but I cant!!  I came across this image whilst googling:


Which in turn led me to Darius's you tube channel and a guide on how to make this!!

Just look at it, I can just see my hens living happily in here, and this is what I've been doing today!!  I'm going to post Darius's video further down because not only is it amazingly informative, it's also a really good guide, if you want to do this yourself (I hope he doesn't mind),  but here are some pictures of my progress so far:

Take one blue barrel:


Measure and draw the door on, the door is 8" wide at the bottom, as stated in Darius's video (note the nail file - I couldn't find a ruler!)

Then draw 2 lines either side of the door 3 inches in from the edge of the barrel


Next, ventilation holes:  As you can see I used a cotton bobbin purely because because I thought it would be a good size.  In Darius's video, he says put the first hole 10 cm from the middle of the top thingy (now obviously he's a genius, he doesn't use the word thingy!), but the first hole there and then I've put every ventialtion hole 1 inch apart 4 either side.


I've made a little mark on either side of the bobbin so I can line the marks up with the original line.


Next I've drilled holes big enough to be able to get the jigsaw into:


Et Voila!! My ears are still ringing from the jigsaw and I think my neighbours may hate me from the noise!


Now deviating slightly from Darius's plan, I decided that I would try and incorporate an existing galvanized tray I had from the house to catch, well, poo under the perches. It did a good job at it before so...  (look at Mr husband photographing skills, he's like David Bailey!)


So I've marked on the underside of the barrel (please check and double check where the top is!) where the tray would fit in and I've cut along and around the back:


And here is part 1 complete!  The tray fits in nicely, though I'm still in two minds whether to keep it in or not,  I might just try and curve the sides in slightly to make it fit better.


My next jobs are to sand down the jigsawed bits, put some perches in, put a nest box in, re-attach the back and the door, put some wheels on and paint it up! 

Here's Darius's Original video:


Friday, 11 April 2014

Fun Friday

I have to start with some sad news today, Mrs Flora Hen (one of the new ex-batts I got a couple of weeks ago) died yesterday.  She was the weaker of the 4, and though she was eating and drinking, she wasn't eating as much as the others really, and they would push her out of the way at feed time.  So she has gone to hen heaven.  The other three are doing fine, they are still at home in the rabbit run, though they did enjoy a day on the plot with me today in their new pen.

I'm not remotely surprised that I am sporting some rather fetching tan (burn) lines (special thanks go out to Papa O for the passing down of that particular Celtic gene.  You know the one that causes immediate lobster like colouring, when a ginge steps partially out of the shadows!)  Its been glorious sunshine today and the hens have loved it.  Shall we take a moment to discuss this behaviour:


Dust bathing in my beds!! Thankfully there's nothing growing in there.

Today, I've done some planting on the plot.  I've wanted to introduce some colour to the plot for a while really, particularly to attract bees and butterflies more than anything, but with 6 main beds I've obviously not wanted to put flowers into them when I can putting fruit and veg in them.  But then I got to thinking, about the new hen pen attachment.  I could grow flowers up the side and around the bottom of that as well as putting some hanging baskets on there (when Papa O brings his drill again because mine is broke!).  This would combat a few things really it would provide the colour I want, it would attract the bees and butterflies, it would provide even more 'fox proofing' (though be it a very small amount) and finally provide some good natural partial screening for the hens in the summer as the plot is south facing, it's full sun all day long.  So, last week on my garden centre visit I bought some Sweet Pea Seeds for this very reason.  Then this morning, I went to buy milk at the local little shop and they had some Sweet Pea plants.  It was 7 for 60p BARGAIN! So I got a a pot to plant along with the seeds.  After work yesterday I also went the local bargain store and picked up a box of wild flower mix for £1.50!! I thought, it was at least worth at try and if they didn't amount to much I hadn't lost much.

Now, all my pens have a layer of mesh running around the bottom, so Mr Fox (hopefully) will be deterred from digging underneath, so I lifted this up:


Put a layer of compost underneath, then pinned the mesh back down:


(The mesh also covers about 2ft on the inside of the pen as well, so there's 3ft to have to dig under)

Next I've covered the mesh with completely with compost:


At this point, it should be noted , I ran out of compost and went to the local garden centre looking like a right trog with my unwashed hair (I hadn't done it this morning, I hadn't expected to see civilisation and frankly the chickens don't give two hoots what you look like as long as you feed them!), mud all over my face as well as clothes and wellies and my particular favourite, massive mud marks on my bum, where I'd been kneeling and resting on my heels! (I know what you're thinking - My husband is one lucky fella!)  Thankfully, Peter at the garden centre has seen me on better days and put a great big bag of compost in my car as I had spied yet more sweet pea plants this time 12 for £1.20p!!

I then planted them by making holes where the mesh was and carefully poking the plant through, as well as putting a couple of seeds in between two plants:


I then got slightly over zealous with the rest of the little plants and planted them too, so lord only knows how many of those seeds will come up! 


In front of the sweet peas, I've planted the wild flower mix -which looked a little bit like porridge oats (I think in a few weeks I might find out why it was only £1.50 and in fact it isn't seeds but porridge in a box marked seeds!)

I then had to section them off because yes you guessed it - the hens started eating them!! You'd think they were never fed!!


I then planted up some tomatoes, in the upside down tomato planter which worked great last year because the slugs and snails couldn't get to them, and found that the old chicken house table makes a great potting bench!:


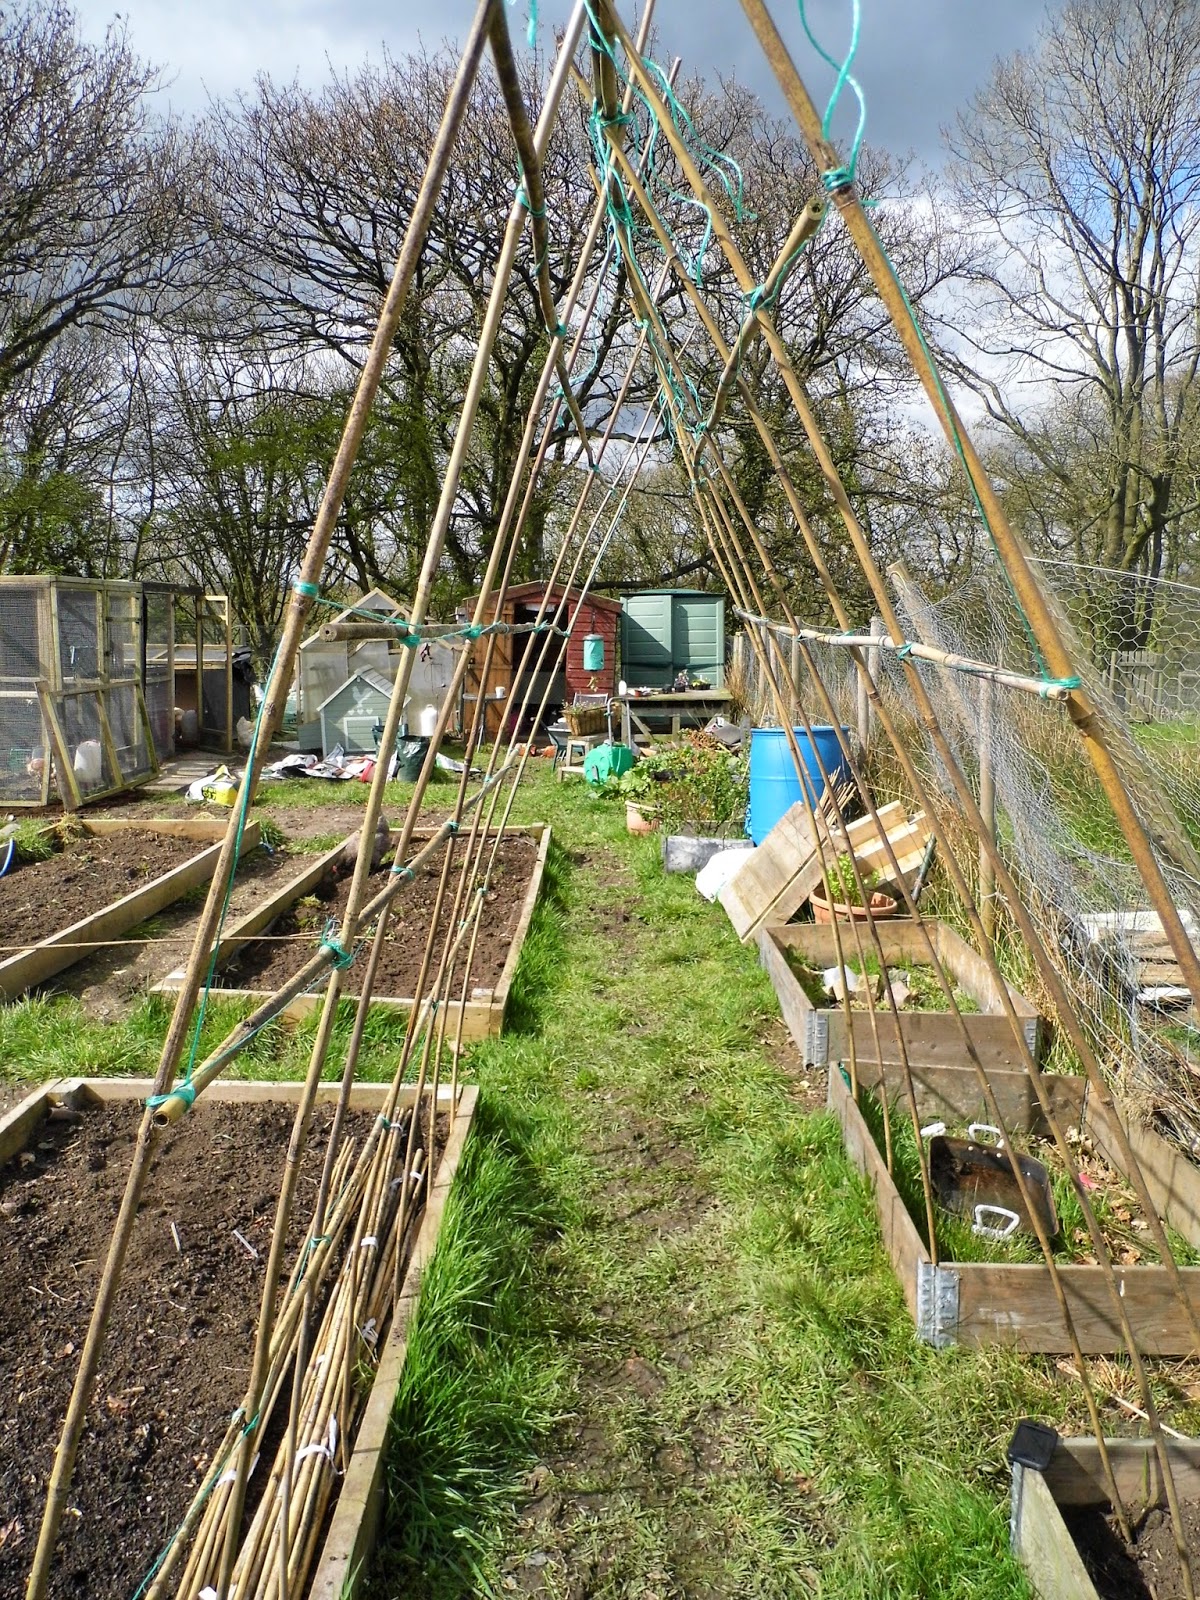
And for my final task of the day?  Well, last year when I planted my peas, and made a pea support thing,  it started leaning and falling over.  Allotment Nigel and Allotment Frank, who are some neighbouring allotmenteers (and frankly, ever suffering...Sometimes, I know they just watch me thinking, what the hell is she doing now?) told me that the reason it was leaning was because the peas where too heavy for the support.  So this year, I decided, that I would incorporate a support for peas, beans and yet more sweet peas as well as some sort of tunnel down the path, and using garden canes I've come up with this:


It's not quite finished because I'd just had enough by that point of working above my head, but hopefully it should be sturdy enough.  With hindsight, you might have to bend down slightly to walk underneath it, and not put on anymore weight, but I think it will look nice with plants on, and if need be, there's always other paths to walk down.


And finally,  today has been quite momentous - PENNY ROGERS HAS LAID AN EGG!!:


(Shes the middle one in the picture)  I've had this bird two years now and frankly she has a free ride, she does nothing, nada, not a jot, gets to eat to her hearts content, isn't remotely friendly, pecks you if you try and pick her up and up until now has only ever laid one egg!  Again, another lucky hen who should be thankful I don't eat meat!  She made that much of a racket that she'd laid an egg and the other hens where looking at her as if too say ' its an egg, its what you should have been doing all along'  and in the end Martha hen got so annoyed with her that she pecked to shut up!

Bye for now & happy planting! Xx